前端框架--Vue(1,基础语法)
什么是Vue
Vue 是一套用于构建用户界面的渐进式框架,也就是说你可以将vue作为应用的一部分嵌入其中,所以项目中既可以有vue也可以有其他的框架,以及关注度分离,使得vue只关注视图层。目前Vue与Angular,React一起并称为前端三大框架。在中国使用最广泛的就是Vue。
Vue 是美籍华人 尤雨溪 开发的,其中借鉴了React等其他框架的内容,但这并不妨碍它成为一个优秀的前端框架,由于作者是国人,所以其文档对国人相对更加友好,国内开发者能快速入门
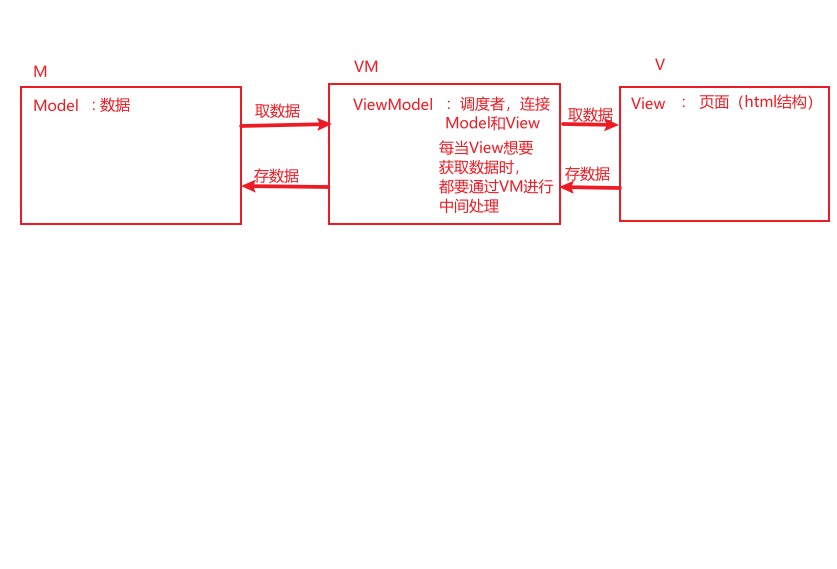
MVVM
MVVM全称为 Model View ViewModel
Vue生命周期
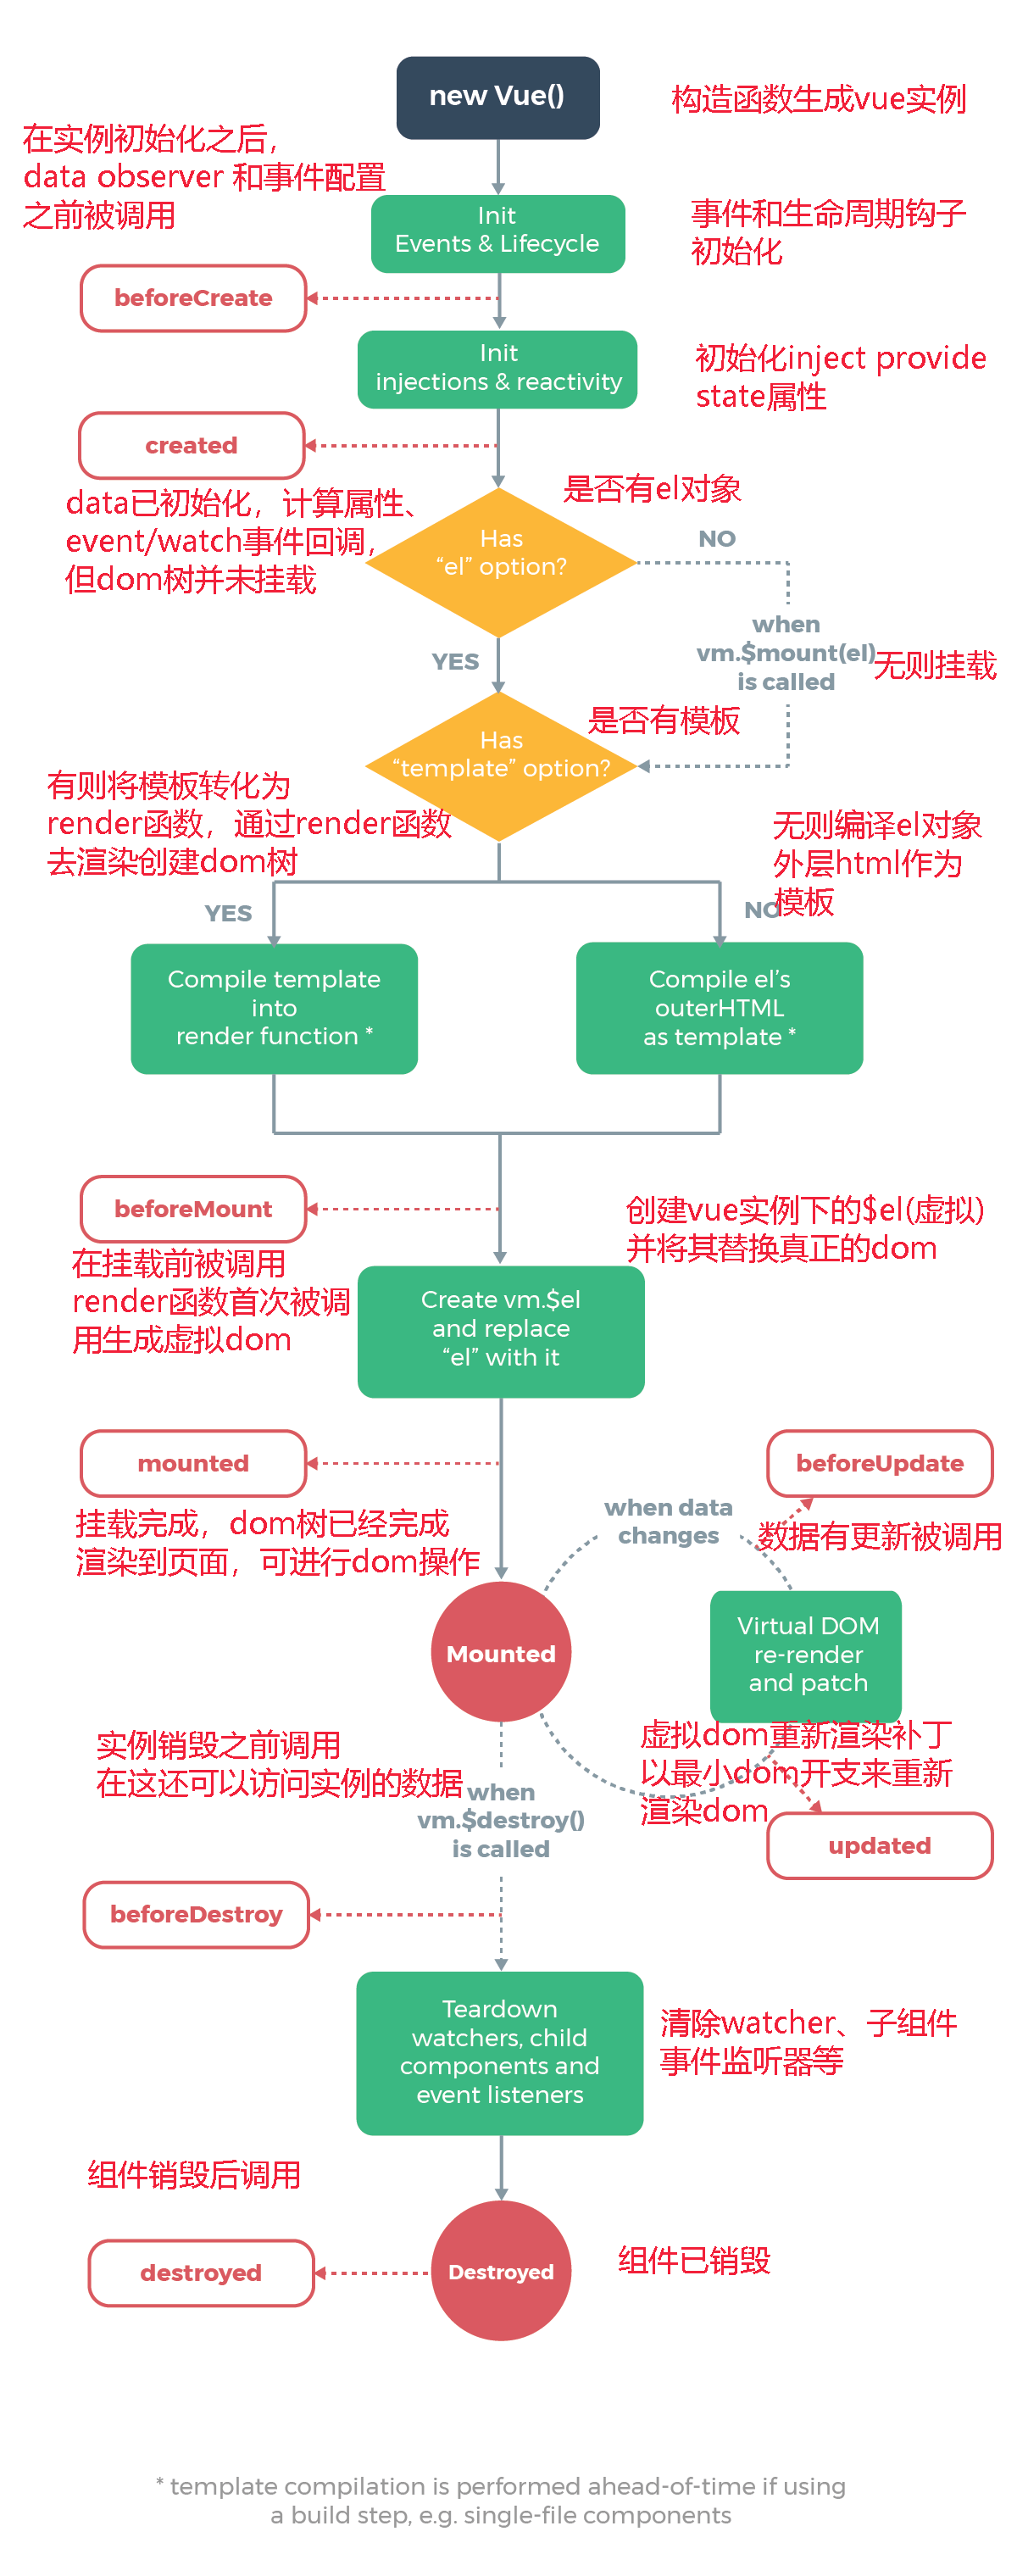
生命周期是指vue实例从创建到销毁的过程,其中各个阶段都有对应的钩子函数,官方图示如下
Vue 安装方式
通过在线cdn导入
<script src="https://cdn.jsdelivr.net/npm/vue/dist/vue.js"></script>-
代码结构如下
1
2
3
4
5
6
7
8
9
10
11
12
13
14
15
16
17
18
19
20
21
22
23
24
25
26
27
28
29
30
<html lang="en">
<head>
<meta charset="UTF-8">
<meta http-equiv="X-UA-Compatible" content="IE=edge">
<meta name="viewport" content="width=device-width, initial-scale=1.0">
<title>Document</title>
</head>
<body>
<div id="app">
{{message}}
</div>
<!-- 在线引入 -->
<script src="https://cdn.jsdelivr.net/npm/vue/dist/vue.js"></script>
<!-- 本地引入 -->
<!-- <script src="../js/vue.js"></script> -->
<script>
const app = new Vue({
el: '#app',//挂载点,表示将vue实例对象挂载在哪个元素上
data: {
message:'hello '
}
})
console.log(app)
</script>
</body>
</html> 通过npm包管理器 安装cli脚手架
安装脚手架之前请确保全局安装过webpack
npm i webpack -g通过npm下载 vue脚手架
npm install vue-cli -g在项目根目录下初始化工程
vue init webpack [项目名],具体操作如下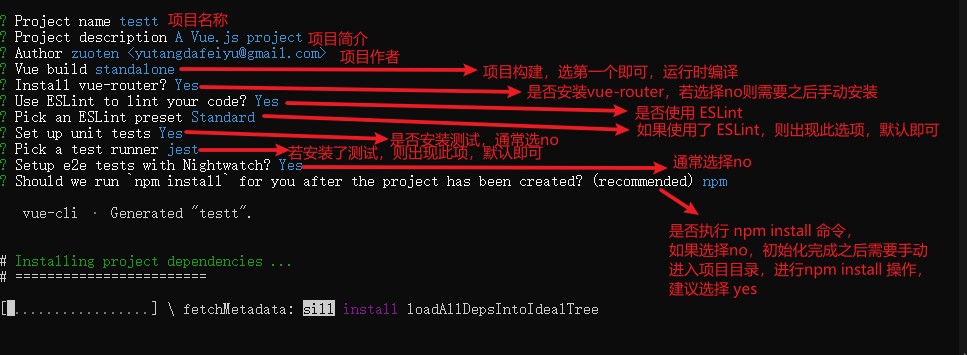
创建后项目目录结构如下
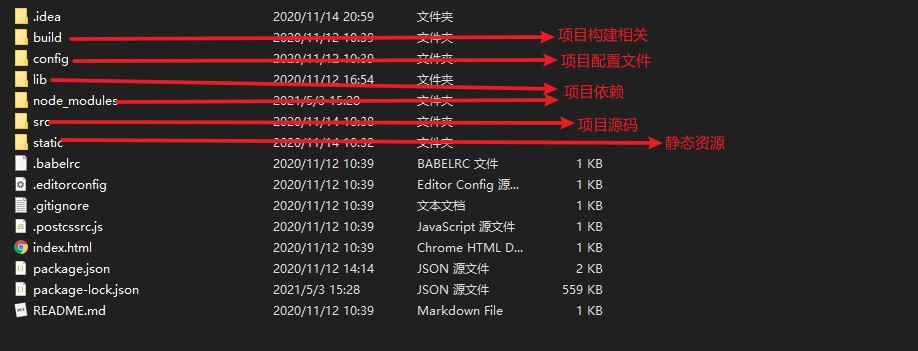
基础语法
以下演示皆使用VueCli
Mustache 插值
使用一对大括号包起来 即可完成Mustache插值操作
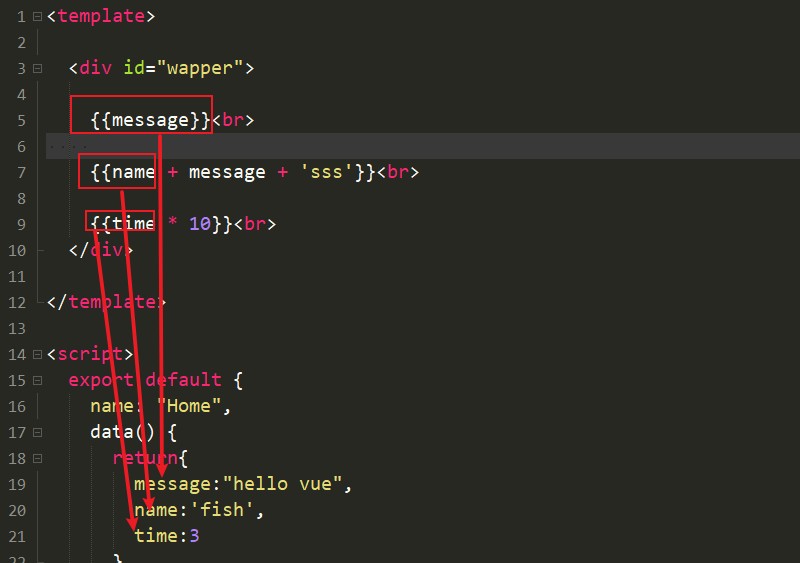
常用指令
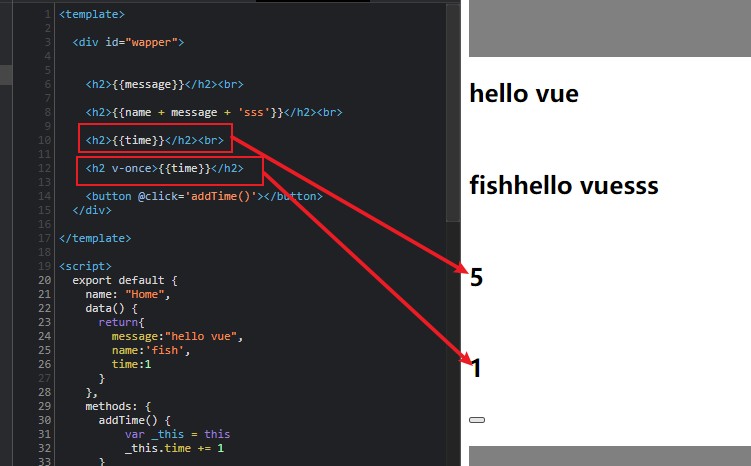
v-once指令只渲染第一次的数据,当渲染出来后,无论绑定的数据发生什么变化,页面上的值一直是第一次渲染的值
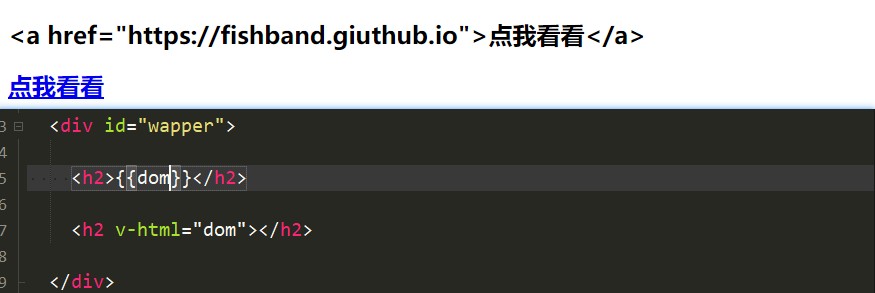
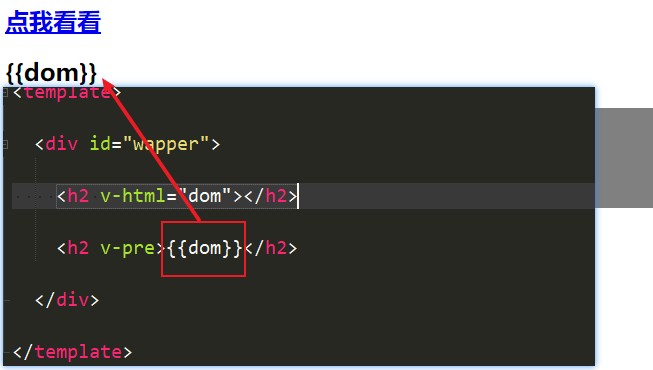
使用v-html 命令,将数据转成html代码并渲染
v-pre 命令可以是标签里面的文本原封不动的渲染到页面上,不受data数据的影响
v-on
v-on 命令作为绑定事件监听器,标签中的各种事件如click,change都可以通过 v-on 指令来动态绑定
1
2
3
4
5
6
7
8
9
10
11
12
13
14
15
16
17
18
19
20
21
22
23
24
25
26
27
28
29
30
31
32
33
34
35
36
37
38
39
40
41
42
43
44
45
46
47
48
49
50
51
52<template>
<div id="wapper">
<div>{{count}}</div>
<!-- 完整写法 -->
<button v-on:click="count++" >+</button>
<!-- 语法糖简写 -->
<button @click="addCount()">++</button>
<!-- 传递参数,count就是data数据中的变量 -->
<button @click="showNub(count)"></button>
<div @click="divClick()">
<!-- .stop修饰符可以阻止冒泡 -->
<button @click.stop="btnClick()"></button>
</div>
<form action="fishband">
<!-- .prevent修饰符可以阻止默认行为 -->
<input type="submit" value="提交" @click.prevent="submitClick()">
</form>
<!-- @keyup 可以监听键帽,当松开键盘时触发,keydown则按下键盘触发,若要监听空格键,加 上.enter即可 -->
<input type="text" @keyup="keyup()">
</div>
</template>
<script>
export default {
name: "Home",
data() {
return{
count:0
}
},
methods:{
addCount(){
this.count++
},
showNub(nub){
console.log(nub)
}
}
}
</script>
<style scoped>
</style>v-bind
- 用于对标签的属性进行数据绑定 如href,src等属性,vue内置语法糖,可以简化为一个:
1
2
3
4
5
6
7
8
9
10
11
12
13
14
15
16
17
18
19
20
21<template>
<div id="wapper">
<img v-bind:src="Imgurl">
<a :href="link">点我看看</a>
</div>
</template>
<script>
export default {
name: "Home",
data() {
return{
className:'test1',
Imgurl:'http://lc-Y09K/demo7.jpg,
link: 'https://fishband.github.io'
}
},
}
</script>- 用于动态绑定 class值,其后面的值可以跟一个对象,key为类名来自于数据绑定,value为boolean 为true时,则把key类名添加至class,为false则不添加,常用于样式切换
1
2
3
4
5
6
7
8
9
10
11
12
13
14
15
16
17
18
19
20
21
22
23
24
25
26
27
28
29
30
31
32
33
34
35
36
37
38<template>
<div id="wapper">
<div :class="{bigFont: isBigFont , redFont: isRedFont}">try</div>
<button @click="beRed()">点我变红</button>
<button @click="beBig()">点我变大</button>
</div>
</template>
<script>
export default {
name: "Home",
data() {
return{
isBigFont:false,
isRedFont:false
}
},
methods:{
beRed(){
this.isRedFont = !this.isRedFont
},
beBig(){
this.isBigFont = !this.isBigFont
}
}
}
</script>
<style scoped>
.bigFont{
font-size: 100px;
}
.redFont{
color: red;
}
</style>- 动态绑定数组
1
2
3
4
5
6
7
8
9
10
11
12
13
14
15
16
17
18
19
20
21
22
23
24
25
26
27
28
29
30
31
32<template>
<div id="wapper">
<div :class="classList">try</div>
</div>
</template>
<script>
export default {
name: "Home",
data() {
return{
classList:null
}
},
methods:{
},
beforeMount(){
this.classList = ["bigFont","redFont"]
}
}
</script>
<style scoped>
.bigFont{
font-size: 100px;
}
.redFont{
color: red;
}
</style>v-for
v-for指令可以用于遍历渲染数据
1
2
3
4
5
6
7
8
9
10
11
12
13
14
15
16
17
18
19
20
21
22
23
24
25
26
27
28
29
30
31
32
33
34<template>
<div id="wapper">
<div v-for="item in imgList">
<img :src="item" />
</div>
<div v-for="item,index in imgList" :key="index">
<!--使用 v-for 的时候提供 key 属性,以获得性能提升 -->
<img :src="item" />{{index}}
</div>
<div v-for="item,index in jsonList">
name is {{item.name}},age is {{item.age}}
</div>
</div>
</template>
<script>
export default {
name: "Home",
data() {
return{
imgList:['http://lc-Y0demo8.jpg','http://lc-Y0demo9.jpg','http://lc-Y0demo10.jpg'],
jsonList:[{name:'fish',age:'18'},{name:'fish',age:'18'},{name:'fish',age:'18'}]
}
},
}
</script>
<style scoped>
</style>v-if 、v-else-if、v-else
条件指令可以根据后面跟的表达式或boolean值 在dom中是否渲染或销毁元素或组件
1
2
3
4
5
6
7
8
9
10
11
12
13
14
15
16
17
18
19
20
21
22
23
24
25
26
27<template>
<div id="wapper">
<div v-if="isShow">show</div>
<div v-if="1>0">show2</div>
<button @click="changeShow()"></button>
</div>
</template>
<script>
export default {
name: "Home",
data() {
return {
isShow:true
}
},
methods:{
changeShow(){
this.isShow = false
}
}
}
</script>
<style scoped>
</style>v-show
v-show指令与v-if类似,不同的是当v-if不满足时,dom根本不渲染或彻底删除掉元素,而v-show不满足时,元素依然会渲染,只是加上了display:none 的样式,将元素隐藏了
1
2
3
4
5
6
7
8
9
10
11
12
13
14
15
16
17
18
19
20
21
22
23
24
25
26<template>
<div id="wapper">
<div v-if="isShow">show</div>
<div v-show="isShow">show By v-show</div>
<button @click="changeShow()"></button>
</div>
</template>
<script>
export default {
name: "Home",
data() {
return {
isShow:true
}
},
methods:{
changeShow(){
this.isShow = false
}
}
}
</script>
<style scoped>
</style>v-model
v-model 实现了数据双向绑定,在元素中使用v-model,其绑定的值会自动赋给元素的value属性,同时,当元素的属性值发生改变时,其绑定的值也会动态随之改变。
它本质上包含两个操作:
v-bind 将数据绑定到元素或组件上
v-on 当元素或组件发生变化时,将绑定的数据重新赋值
1
2
3
4
5
6
7
8
9
10
11
12
13
14
15
16
17
18
19
20
21
22
23
24
25
26
27
28
29
30
31
32
33
34
35
36
37
38
39
40
41
42<template>
<div id="wapper">
<input type="text" v-model="message" />
{{message}}
<br>
<input type="radio" v-model="sex" name="group1" id="man" value="男"/>男
<input type="radio" v-model="sex" name="group1" id="women" value="女"/>女
你选择的是:{{sex}}
<br>
<input type="checkbox" id="read" v-model="isRead" />同意协议
你{{isRead?'同意了':'不同意'}}此协议
<button :disabled="!isRead" value="">下一步</button>
<br>
<input type="checkbox" value="篮球" v-model="hobbies" />篮球
<input type="checkbox" value="足球" v-model="hobbies" />足球
<input type="checkbox" value="排球" v-model="hobbies" />排球
<input type="checkbox" value="棒球" v-model="hobbies" />棒球
你选择了{{hobbies.length==0?'无':hobbies}}
</div>
</template>
<script>
export default {
name: "Home",
data() {
return {
hobbies:[],
isRead:false,
sex:'男',
message:'hello '
}
},
methods:{
}
}
</script>
<style scoped>
</style>


